Tascam X-9 Mixer Repair
 This page documents my repair of the Tascam X-9 DJ mixer. A few weeks ago I
started to see error codes “err1” and “err3” on the LCD display. For about the
first two minutes of running, none of the buttons on the mixer would work, and
the output popped and cracked. After warming up it seemed to work ok, but it
also seemed to be getting worse.
This page documents my repair of the Tascam X-9 DJ mixer. A few weeks ago I
started to see error codes “err1” and “err3” on the LCD display. For about the
first two minutes of running, none of the buttons on the mixer would work, and
the output popped and cracked. After warming up it seemed to work ok, but it
also seemed to be getting worse.
I poked around online looking for anyone that might have ran into the same problem, but all I could really find was a 4 year old forum post without any real solution. So I decided to poke around myself and found that the problem was a bad capacitor. Thankfully it turned out to be a relatively easy fix.
Things you’ll need:
- Phillips-head screwdriver
- Small/needlenose pliers can be handy
- Soldering iron
- De-soldering tool (solder sucker or similar tool)
- Rubbing alcohol
- Solder
- 10,000 μF 16v Capacitor
I ordered my capacitor here. Yes it is a package of 10, but it seemed to be the easiest way to get them. And you’ll have a spare in case you run into problems again.
But before you go ordering things, read on to make sure a bad capacitor is your problem.
The first step is to remove the top cover. It’s held on by four screws, two on the front panel and two on the back. Remove these screws and gently lift up. Note that there is no need to remove any knobs from the top surface.

Now disconnect any wires holding the top panel to the rest of the components. The ribbons can be pulled gently out of their sockets. Be very careful not to tear the ribbons or you will have a whole new problem on your hands. The plastic connectors can be carefully pulled from their sockets with a pair of needlenose pliers. Set the top panel aside. You should now see the interior of the mixer.
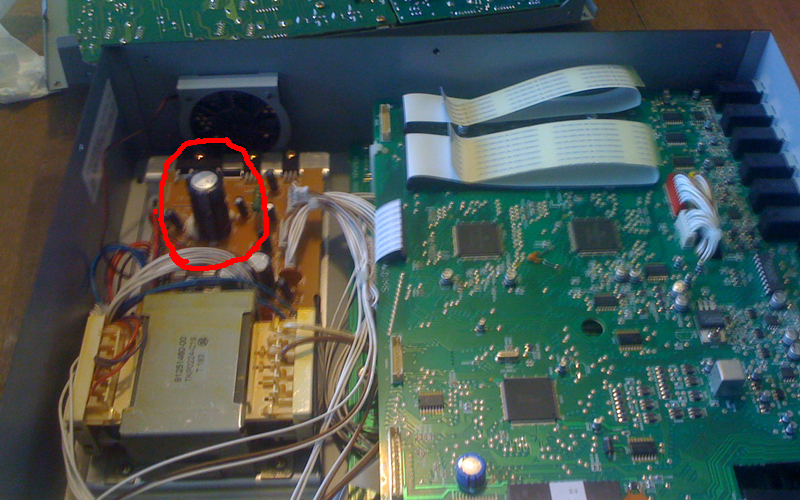
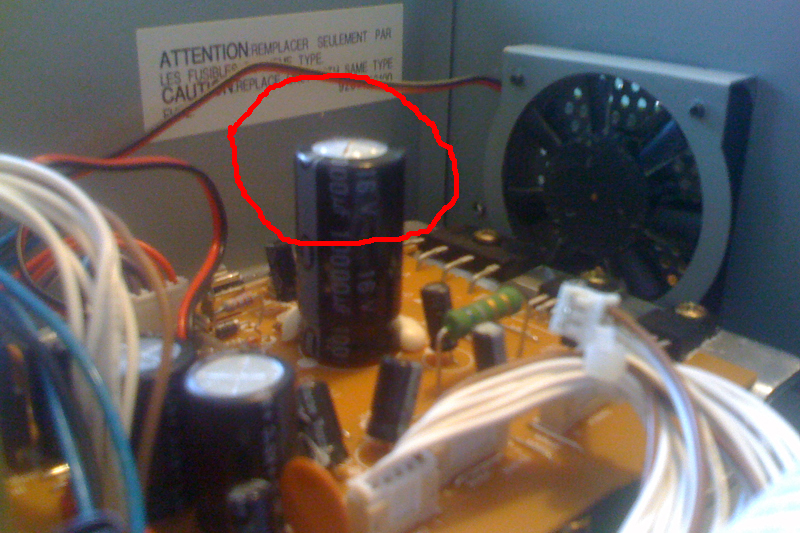
Now set the top panel aside. Look at the large capacitor next to the fan. In my case, this capacitor was bad. There are several signs to look for. The top of the capacitor should be flat. Any bulging is a sign that it needs replacement. Also, any brown oozing that looks similar to battery acid is a sign that your cap is bad. Click here to read more. The capacitor in my mixer was bulging at the top, indicating it had failed.
To replace the capacitor, unscrew the five gold-colored screws holding down the board that the capacitor is attached to, and detach the wires so you can fully remove the board. You must now de-solder the bad capacitor. If you are unfamiliar with the de-soldering process, read this article. Be sure to pay attention to which side is positive and which is negative. Thoroughly clean the board with rubbing alcohol once you have successfully removed the old capacitor so that the new solder joint is strong.

Now you must solder in the new capacitor. Insert the leads through the board, paying attention to which is the positive and which is negative. With the capacitor flat against the board, heat the leads with a soldering iron where they emerge on the other side. Then melt some solder on the hot leads, thereby securing them to the board. Make sure there is enough solder to hold the capacitor securely, but don’t bridge the gap between the two leads either. Then trim the excess wire from the leads so they don’t stick past the solder joints. Click here to read more.

Now simply put everything back together in reverse order. Reattach the wires to the small board with the capacitor, and screw it back down. Then reattach the wires to the main top panel and screw it back down. Plug it in, power it on, power on your speakers, and give it a test!